It is an almost universal desire; to capture the rose in its state of perfection for all time. We are fortunate to live in an era that allows us to do so through both conventional photography and the new digital media. No matter which one you are working with, most of the same rules of photography apply. (Really, the only item discussed here that does not apply to both is the choice of film, which obviously doesn't apply to digital cameras) The basics of good flower photography are really very simple, and there are some easy tricks and tips for making a photo of your favorite rose a better one.

Lindsay's Rose
Film Now that conventional film technology has evolved to a state of great sophistication, it is even more important to choose a film that will do the job right. The first thing you should know is that your photographs will improve significantly by choosing the Professional grade color films, especially the transparency (slide) films. The consumer grade films are made for snapshots and vacation photos, and they are very different from the Pro films. The Professional films generally have less contrast and less dye saturation, which for the photographer translates into more realistic images. Consumer grade films make for "punchier" pictures, but they tend to render much less realistic, oversaturated colors, and when you are photographing roses, you want the colors to be as realistic as possible. Therefore I suggest using the Fuji Professional print films and transparency films. Fuji makes a very fast, excellent color print film which can be exposed at between 400 and 800 ASA. That means you can use long lenses and fast shutter speeds for intimate, sharp, still photos. The Kodak Kodachrome films are still excellent choices for slides, and many photographers recommend these as well. My personal preference is for the Fuji Provia film in either 100 or 400 ASA. The faster film has a bit less saturation, but is still wonderfully sharp and accurate. Whatever you do, please handle color films properly: do NOT expose them to high temperatures at any time before processing! (Developing) Excessive heat exposure will damage color film quickly, resulting in poor pictures and undesirable color shifts. This is especially important when using the Pro films, as they are more sensitive to heat. If you cannot have the film processed immediately, then store the roll in the fridge in its plastic container.
Tripod It is of great importance to make sure your subject remains as still as possible while you are taking the picture. The camera too must be held still to get a sharp, well focused image. One of the best tools a photographer has in the garden is a tripod. You can buy a very good Manfrotto tripod now for about $100, and it will be an asset for many years. Often when working in the garden taking photos, the tripod is necessary because to get reasonable depth of field, the shutter speed will often be quite slow, IE: 1/60th of a second or longer. You can't possibly hold the camera still enough to get a sharp image at such a slow shutter speed, so its a must to use a tripod. There is a rule about the relationship between lens length and shutter speed that goes something like this: You can safely hand hold the camera at a shutter speed that most closely matches the length of the lens. That is to say, for example, that if you are using a 210mm lens to take your picture, then the slowest shutter speed you should use without a tripod is 1/250th of a second. Anything slower than that and you risk a blurred image. One more example: if the lens is a 50mm lens, then you can hand hold the camera at 1/60th of a second. This presumes that you have a steady hand, of course!

Mayor of Casterbridge
Depth of Field Another important consideration when photographing the rose is depth of field and depth of focus. Most people have encountered the term "depth of field" but may not know "depth of focus". They are related terms, and I'll discuss them both. When you photograph an object, there is a direct relationship between the aperture size (IE: f8, f11, f16, etc.) and the amount of foreground and background that is held sharply in focus. The smaller the aperture, the more that will be in focus. I find that creative control of the depth of field is one of my greatest assets in photographing roses. I usually try to carefully engineer depth of field so that only the most important areas of the subject are in focus. Often, only the bloom itself will be sharp, with leaves and background details falling off into a blur. This helps to isolate your subject from what can often be a distracting background, especially if you are taking pictures out in the garden. It is important to know a bit about "depth of focus" as well. If you are taking a picture using a fairly large aperture (close to wide open), then where you focus is critical to your results. When you get very close to an object, you should focus on some point about 1/3 of the way into the object. That way, when the lens closes down to take the photo, you will find that the majority of the object is sharp from front to back.
Time of day and lighting conditions Some photographers will tell you that an ideal time to take photos is just before sunrise or immediately after sunset. That may work for some types of photography such as landscapes, but its not going to help you take a good rose photo! Early morning sun presents two problems, in my experience: the angle of light is too sharp and creates hard shadows that often appear to go the wrong way. Also, there are definite color casts to early morning and late evening light. That means that you will get pictures that are often more orange/yellow than they should be. In my opinion, roses should be photographed to show their true color. For that reason I avoid early morning photography. Wait till at least 9 or 10 AM, or best of all, take your pictures on a cloudy day.
Belinda's Dream without a reflector
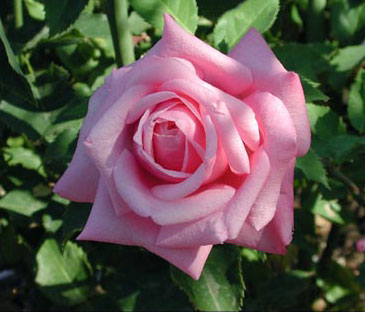
Along the same line, many people avoid taking garden photos at high noon because they have preconceived ideas that their photos will come out badly. While this rule may be useful when photographing people, (you get long shadows and dark eye sockets) roses hold their faces up to the sun (generally!) and are perfectly photographable in the bright sun of mid-day. Consider the photo of '' at the top of this page. That image was taken at mid-morning with strong direct sunlight, and the effect is still very pleasing. Now, that being said, it is even better to photograph on a hazy day, or when the sun goes behind a cloud. Even rainy days can be excellent opportunities for garden photography, but don't get hooked into the idea of having dew drops on every bloom, every time! (Dew covered blooms are great, but they get very stale if you do it all the time!) The trick is to try taking pictures under all kinds of light conditions and decide which works best for you. Personally I really prefer hazy light when the sun is partially obscured by thin clouds. That way, you can get some distinct shadows to your subject, but without the harshness of direct (specular) light. It helps make for a "tactile" photo that has good shadows and yet offers rich, saturated color.
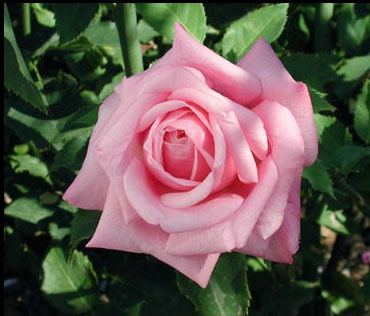
Belinda's Dream with a reflector
Fill cards and Reflectors There are some easy tricks you can use when you have no choice but to take your pictures under strong overhead sunlight. The most useful trick is to use a reflector card of some sort. It can be something as simple as a piece of white card, or even a piece of white paper. My favorite choice is a piece of white styrofoam, the kind that is used for packing material and insulation. Its light enough to carry around with you anywhere, and reflects a very nice quality of light. Shown here are two photographs of 'Belinda's Dream' taken about 10:30AM one morning. The first one is taken with natural light and no reflector card. The second photo is exactly the same lighting, but I have placed a white card (in this case it was the styrofoam) to the left side of the bloom where it reflects some light into the shady side of the rose. This isn't a difficult trick to make use of, but you will need to experiment to see how close you should hold the card, and at what angle it works best. Be careful to see how much light you want to reflect into the shady side of the bloom; its possible to use too much fill lighting and ruin the sense of natural lighting altogether.
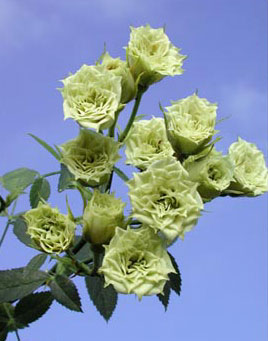
Green Diamond
Choose a background One of the most effective things for creating a great rose photo is isolation of the bloom from the background. There are many ways to achieve this effect. One is through shallow focus, which blurs the background sufficiently to draw all attention to the main subject. Another way to accomplish this is to pay close attention to, and arrange the background carefully to eliminate any distracting clutter. I find that choosing a simple, uncluttered background is a very important tool. While I like rose photos that look natural, with foliage in the background that appears as it really is on the shrub, I also like to remove blooms to isolate them for greater emphasis. Consider the photo of 'Green Diamond' shown here with a soft blue background. How was this achieved? The bloom stem was simply held up against a blue sky when a passing cloud created soft light on the rose. The effect is subtle and it is hard to tell how the lighting was accomplished. And yet, it has a pleasant effect. Its a good example of isolating the subject effectively from the background to place proper emphasis on the subject.
Some people like to create similar effects by taking fabric or paper backgrounds out into the garden with them to place behind the blooms. That can be equally effective, although I like to work with naturally occurring backgrounds.
Modifying the light quality As I have mentioned, you can get great results by waiting for a passing cloud to obscure the sun, creating a softer, more tactile light for your photo. If there are no clouds, there are alternatives. You can make some sort of diffusion device to soften the light quality. You can buy inexpensive white translucent Nylon material from the fabric store and stretch it over a lightweight frame to make your diffuser. I have used a section of old PVC tubing to make a hoop and stretched the Nylon over it. You can buy expensive diffusers from a photo specialty store, but these are very expensive and not the slightest bit better than a home made one. The plus is that a diffuser can double as a reflector as well, for lighting up heavy shadow areas in bright sunlight.
Lavender Pinocchio
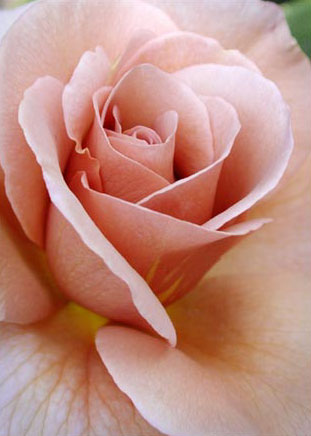
Get Close! Finally, I cannot emphasize how important it is to get CLOSE to your subject some times. You can learn a lot about how to visualize your subject by exploring it in its tiniest details. Shown here is an extreme closeup of a bloom of 'Lavender Pinocchio', one of the "Coffee Roses". Photographed under cloudy skies, the exquisite details glow in the heart of that bloom. The minds eye can almost conjure the fragrance because you are so close to the rose. Photographing roses is an intimate experience, because that is one way you get to know your roses (or any aspect of a garden) in great detail.
If you happen to have a digital camera to work with, most of these suggestions will work as well as they do for "real film" cameras. In fact, several of these images are done with my Nikon Coolpix 990, including 'Lavender Pinocchio' here. Working with the digital format has the advantage of cost efficiency: you can take pictures all you like and it costs you nothing but the disc space to store them! That allows you the freedom to experiment with techniques and approaches without feeling like you have to hold back. There is a lot you can teach yourself about photographing the rose by simply trying different things. Go wild....the only limit is your imagination!
One final note on another topic: Sequoia Nursery is working to obtain many of the older Miniature hybrids they once produced in order to create a collection of all the Moore Miniatures. They are asking for the public's help in locating a number of these "lost" roses. If you have any of the roses on the list and are willing to share cuttings, please contact Carolyn at Sequoia and let her know. Your assistance will be greatly appreciated. Click here to view the list.
Article originally published on
Paul Barden's website and includes alterations to the original format.
